Welcome to the “ABOVE” page. This is the download and help site for the satellite tracking and astronomy calculator program, ABOVE, by Dr. Al Gerheim, K1QN.
Version 2.0 uses the serial port of the HP-50G to communicate with a GPS receiver or a Kenwood TH-D7A(G) Data Radio. See http://k1qn.info/above/ABOVE2.html
Note: Upgraded to version 1.01 May 23, 2006, and version 1.02 July27, 2006. Please report any problems via the "feedback" link below. The upgrade allows the user to edit an existing stations data.
In the old version, the user had to delete the station and re-enter everything. Bummer! For version 1.02, I brushed-up the running display for the Predictions mode. Now, you can see the observations as they're calculated. It shows the last 11 encounters.
Celestrack started appending stuff like "[P]" to the satellite names, making them hard to parse. Version 1.03 corrected this. November 1, 2006.
Two changes: First, I made it easier to adapt to stuff they put in the satellite names. Second, you can now put different kep files on different SD cards, and the satellites you want to see will change when you change the SD card. There are 3 files that give your satellite preferences. They're on the SD card now. Version 1.04, March 1, 2007.
I found an error when the positions of celestial bodies are predicted into the future. It was corrected in version 1.05. May 16, 2007.
This program started out as a satellite tracking program for the HP-48S calculator. In this form, it was available on the AMSAT web site. It was fast, accurate, and had graphical output which enabled the user to aim handheld antennas during satellite communications, and it could be used to predict future passes.
The present version is aimed at the HP-49G+ or HP-50G calculator. Versions 2.0 and higher will have features which will only work on the 50G. It makes use of the larger screen, better interface functions, and higher speed of the new calculator. It has greatly expanded utility and ease of operation. It can simultaneously track multiple satellites, the sun, moon, the planets, and stars selected from a list of the 300 brightest. Real time displays include a text listing for multiple objects, sky chart, and a single-object sky chart. It also has a prediction capability, which collects information on future passes. Keplerian “2-line” data for the satellites is parsed on the calculator itself, and may be stored on an SD card (port 3), or on another data port.
Quick Start:
1) Download ABOVE v1.04.zip, or ABOVE v2.0.zip. In it you will find 4 directories: ToPort2, ToPort3, ToLSATdir, and Code.
2) Put the contents of ToPort2 in PORT2. There is only one file here, the library object ABOVE which contains the program itself.
3) Put the contents of ToPort3 in PORT3 if you have an SD card in place, or you can also put these files in another port if needs be. These 3 files contain the star data (STARS), an old set of Keplerian data (keps.txt), and the file BRIGHT which contains data on the 24 brightest stars.
4) Put the contents of ToLSATdir into a directory named LSAT. Actually, the name LSAT is just a suggestion. This file is a directory containing valid starting data for the program. You will change it using the program to suit your station’s needs.
5) The directory “Code” contains the actual code for the program. It is supplied for your amusement. All the functionality is in the library object in step 2).
6) Set RPN mode. All the programs, and the programmer, are designed for RPN. Also, use the “Small” display options.
7) Attach the library to the directory. Go to the LSAT directory and attach the library. In RPN mode you type 1066 (the library’s address), press “ENTER”, then type “ATTACH”, and press “ENTER”. You can then hit LIB (right-shift, 2), and the menu should show the entry “ABOVE”.
8) Parse the keps. There are some options here. If you want to start with up-to-date keps, then go on the web (http://celestrak.com/NORAD/elements/ or http://celestrak.com/NORAD/elements/amateur.txt are good starting points), and copy the text to a file on your PC. The parser can’t digest any header information, so the text must start with the name of the first satellite. Then load the file to the HP-49G+/50G using the HP connectivity software. You will get a syntax error because it can’t identify the type of data you loaded. Not to worry! The data will appear as a string at level 1 in the stack. You’re all set. Go into the ABOVE library (hit the ABOVE key after you do right-shift-2 (LIB)). You will then see the menu key “Begin”. Hit it. A menu will appear. One of the entries will be “PARSE KEPLERIAN ELEMENTS”. This item may be on the second page of the menu. Select that item and hit the “OK” menu key. First, it gives you a friendly reminder about the start of the file. Then it prompts you for a port number. Enter the port number where the star data is located. (Again – if you have an SD card in place, this should be port 3.) Then it asks where the Keplerian data actually is. It should be on the stack. Highlight “On the stack” and then hit “OK”. The calculator will then cook for a while. It’ll give you updates on progress, and it tells you how it renames the satellites. It may have trouble with some satellite names. It should assign unique names to all the GPS satellites, as well as all the entries in the list of “100 (or so) brightest satellites”. If you want to use the old Keplerian data, or if you already have a good set of keps on the port, then select the menu item “On the port” instead of “On the stack”. The rest of the execution will be the same.
9) Enter your own station data. Go to the “Begin” menu again, and select “EDIT STATION LIST”. This should be near the end of the list, on the second page. Select “ADD”, then enter your callsign, latitude, longitude, and altitude (in decimal degrees and meters). (Please, no “-“, “/”, or other arithmetic symbols in your callsign – the HP has a bad time with them. It assumes you want to do arithmetic whenever it sees that stuff on the stack. Use a period, “.”, if you need a separator.) This should create a file named with your callsign, and your callsign will appear in the “SELECT STATION” menu when it comes up.
10) Set
your timezone. Again,
go to the Begin menu, and select “SET TIME ZONE”.
This is at the end of the list, on the second page.
Select your offset from GMT. The
default is -8, which is PST. EST is
-5, and so forth. The list should
have all the oddball options like
11) You’re all set! The 4 main functions are Real Time List, Full Sky Chart, One-Object Sky Chart, and Predictions, which are described in detail below.
Common Operations:
I use the same routines to select objects and stations in all the
routines. To select a station,
simply highlight it in the list. The
next time you’re asked to select a station, the last-selected
station will be at the top of the list, in the default position.
Separate object lists are maintained for each of the 3 multiple-object routines. If you want to manually change any of them, SKY1 corresponds to REAL-TIME LIST, SKY2 corresponds to PREDICTIONS, and SKY3 corresponds to FULL SKY CHART.
Computation Time
The different objects require different computation time, as follows: Satellite: 5 seconds, Sun: 3 seconds, Planet: 5 seconds, Star: 1-2 seconds, Moon: 20 seconds. The routine for the Moon is extremely detailed.
REAL-TIME LIST
The output display is a real-time
list of data for up to 9 objects. Data
includes Elevation (EL), Azimuth (AZ), Range, Latitude (LAT), and
Longitude (LON). Angles are
measured in degrees, rounded off to 1 degree. The
range is in kilometers (rounded to 1 km), or AU (rounded to 3 decimal
places) as appropriate. For Stars,
the range is just given as “STAR”.
FULL SKY CHART
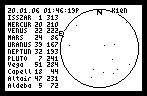
The output here is a sky chart with a pixel for each object above the horizon. It gives azimuth/elevation data (in integer degrees) for up to 11 of them. This sky chart and the one-object sky chart use East-on-the-left orientation, mimicking the real sky. You can rotate the calculator to align its horizon with the real horizon, and all the objects will line up. Notice that the International Space Station (ISSZARYA) has just appeared over the horizon.
ONE-OBJECT SKY CHART
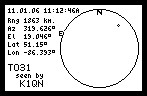
The full sky chart won’t respond quickly enough if you’re trying to aim an antenna at a satellite. So I retained the one-object chart from the HP-48 version of the program. I used the extra screen space to display more detailed data on the object.
PREDICTIONS
Before every prediction run, you should go to the Begin menu, and select “CLEAR COMPUTED PASSES”. This clears the variable “PASS”, a string which contains text descriptions of previously computed passes. If you don’t clear the computed passes, the new data will just be appended to the previous data. The program allows you to edit a list of objects, asks you for a station, then asks where the output is to go. You can print directly as you compute the passes, store the data in the variable “PASS”, or both. Then it prompts you for start time, end time, and increment. The dates are in D.MMYYYY format, and the times (including increment) are in H.MMSS format. The default data is initialized with the current time, continuing for 24 hours, with 5 minute increments. You can edit the time settings on the screen, then hit “ENTER”. It will display the time it’s examining, along with a list of any objects above the horizon at your station at that time.
You can hit “ON”
to stop execution at any time if it’s gone far enough into
the future. Then you can “
Housekeeping – Keplerian Data
From time to time, you’ll have to update the Keplerian data, or maybe even get data on new sets of satellites. If you’re not careful how you do this, you can wind up with lots of out-of-date files on your port, and you might have to remove them manually.
When the Keplerian data is parsed, a record of the transaction is kept in the file BDIR on the same port as the rest of the Keplerian data. It should stay synchronized with the actual data on the port. My original idea was to use the command PVARS to collect a list of files on the port. However, this command doesn’t work on the SD card.
In the Begin menu, there’s a command “CLEAR KEPLERIAN DATA” which removes all the files listed in the file BDIR. You should use this command immediately before parsing data for new satellites. If you’re parsing data for the same old satellites, it doesn’t matter, as the old files will just be overwritten.
If you want to maintain data on different kinds of satellites, Amateur Radio and GPS, for example, I suggest that you manually edit the 2-line element file to concatenate the data, then load it, as a single string, to the HP-49G+/50G.
Possible Upgrades
Speed. There’s a lot I can do to speed it up. For one thing, it computes planet positions totally from scratch every time. This includes calculating a sun position, and computing up-to-date orbital elements via polynomial expressions. This says nothing of converting the whole project from UserRPL to SysRPL.
Accuracy.
I used J1950 Epoch for the Sun and Moon.
This should be upgraded to J2000 Epoch on general
principles. Also, the satellite
tracker I used is a striped-down version of the NORAD SGP algorithm.
I could upgrade to the full SGP algorithm, but I think
speed would suffer.
No perturbations were used for any of the planets
Stars. There are two problems, and they both would have the same solution. First, there are an awful lot of them. Going through the list in its present form is only marginally acceptable, and would be totally unacceptable with a larger list. The user should have “sort” and “search” capabilities to access the stars of interest. Also, the calculator seems to have a difficult time dealing with lists larger than about 32k. The solution would be to fold up the data so the user could select stars based on brightness, catalog number, constellation, or some other attribute. The data could be divided into smaller files, and the user should be able to get to the right file based on menu selections.
Comets and Asteroids. I’d like to easily upgrade if a comet or asteroid makes a visible pass. With the curent configuration, you have to update two lists: PDATA and PLIST. A better solution would be to open a new menu with asteroids and/or comets, just like the current arrangement for selecting stars.
Port 3. I suggest using Port 3 for the star and Keplerian data because you can take it out and modify its contents on a PC, where it’s easier. There was some functionality I really wanted, the least of which was the ability to perform directory operations (PVARS), and access libraries, on that Port. HP seems to indicate it may upgrade the capabilities for the SD card. In the mean time, be patient.
John Wrobleski, KF2H, made some excellent suggestions regarding astronomy-related issues in this project. He also worked through some really pernicious problems in the download and setup phase.
The routines for solar and lunar
motion were taken from "Astronomical Formulae for Calculators" by Jean
Meeus. Data for the 300 brightest stars was parsed from http://anzwers.org/free/universe/stars.html.
Orbital elements for the planets were taken from http://www.cilea.it/~bottoni/javascript/dati-pianeti-jpl.htm
Almost all the development took place on HPUserEdit, http://www.hpcalc.org/details.php?id=4746,
a really excellent tool which includes an emulation and a development
environment. The motion of celestial bodies in orbit was
first empirically described by Johannes Kepler http://www.kepler.arc.nasa.gov/johannes.html.
DISCLAIMER
This software is intended for entertainment only. If you want to do serious navigation, communication, or astronomy, take out your checkbook and go elsewhere. Always keep in mind what the old backpacker said when GPS equipment came into use in the backcountry: “Never trust your life to anything with batteries or a reset button.”
Also, I have no connection with HP, besides that of a consumer and fan.
OK - this isn't a gag. Dogs are the best, and petfinder.com is the best way to find one: